Hand Things Down’s first iPhone application
We had a big deadline, yesterday, to have an iPhone app running. For those of you who who’ve heard about the multitude of hurdles that you have to cross in order to get an iPhone app working, I will summarize my experience over the past couple of weeks. I am not even talking about submitting an app to the Apple App Store, only to get it running on a device.  If you read no further, know this: DO NOT WAIT until the last minute and think you can do this in an hour; there are logistics that involve faxing(!!) and people at Apple, so it will take days. Hopefully some hints, here will help to trim that down.
Here are the steps (from memory):
- Join the Apple Developer Connection (developer.apple.com).  This is free and it will give you access to bunch technical information and videos (but not all!). This step is quick and painless.
- Find your way through one of the Dev Center links or just go to developer.apple.com/programs/register.
- Be sure that the email address and name are what you want to use because they will verify subsequent information, later (in the certificate used to run your app on your actual device).
- You will need to verify the email address through the email they send you. This is automated, so it shouldn’t take long.
- Once you have registered, you can also download the iOS SDK so that you can develop an application and run it in its simulator. This, of course is the same SDK you’d use for iPod Touch and iPad development.
You have to have Mac OS Snow Leopard (10.6.4) or later to install the SDK… expect an upgrade from 10.5 to take 2-3 hours, after the update patches that might be required, are also applied.
- To run your application on an iPod Touch, iPhone, or iPad, you need to join and pay for the “iOS Developer Program.†This process isn’t specific to iOS; you will be able to opt into one of Apple’s three developer programs, iOS, Mac, and Safari. The first two cost $99. and the latter is free.
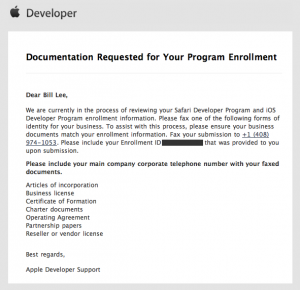
- I needed to register our company as the “developer†so that any applications are released under the company’s name, rather than my own. Apple wants to verify that it is a legitimate entity; so they sent an email asking me to fax proof of the company’s validity (Fax?!! Really, Apple?! Really?!!). They manually review the paperwork before anything else happens. By taking the time to read this blog-post, you can avoid the time and frustration I had to go through (they never processed my fax):

Apple Dev Program company paperwork request
Call Apple Developer Support at one of their phone numbers—for the US, call (408) 974-4897 or (800) 633-2152, Mon-Fri, 9:00AM-7:00PM CST. Tell them that you’d faxed your paperwork in 3 or 4-days ago. If you are nice, they will send you an email where you can attach your paperwork and email back!
That little tid-bit might save you days of waiting. If you are an individual developer, then this might not apply.
- You will get another confirmation email, “Information Received Regarding Your Enrollment,†from them as soon as the support person does whatever they do. You’ve yet to pay, however. I had to wait for another 2-days to receive an “Apple Developer Program Enrollment Update†email. If you do not receive this email, you can try writing your support contact again or try the link that you will eventually get, to see if you can proceed: developer.apple.com/ios/enroll/purchaseProgram.action. It took me two days to get this email. I was then able to pay.
- The next day I received an invoice and the confirmation email “Thank You for Joining an Apple Developer Program,†and I was no longer beholden to the black-box procedures of Apple (as far as I know… see my next posting). Now I have access to the additional technical information and I am able to go through the logistics of deploying my app to my iPhone, for the first time.
Total time, for me: 11 days, most of it waiting on Apple!! Hopefully this post will allow you to cut a week off that time. Happy programming!
 I use the command line a lot, even though I am on a graphical user-interface (GUI) on Windows, macOS, or Linux. And since I’m lazy, I write a lot of scripts to perform repetitive tasks. I stumbled across macOS commands that allow command line programs to copy/paste between the clipboard that we’re so used to using.
 As I mentioned in my prior post

I Just Want to Submit a Frickin’ iPhone App to the App Store! (Part 3)
Way back in in “I Just Want to Create a Frickin’ iPhone App! (Part 1),” I walked you through the logistics of joining the developer program (no, you didn’t miss “Part 2,” I have not written it yet). Fast-forward a couple of months and it’s time to submit to the app store! For a company that has built a reputation on simplicity, Apple has concocted an arcane process and made it worse by not providing any complete nor accurate information to help with the application submission process.  Apple’s minimalistic approach is of no help… you often feel like your flying blind as you try to make your way through the process. I’ll try to give some heads-up and clarity if you, too, are going through this for the first time.
So, let’s hope I can remember all that I went through.
.plist file, so you can access its “CFBundleIdentifier” (aka “Bundle identifier”) explicitly. The value in the app should be the reverse domain name, for example, “com.handthingsdown.htdmobile”; do not prefix the “Bundle Seed ID” to the bundle identifier in the app.Resources
Posted in Commentary, Technical